A 5-minute guide to cap-assisted hemostasis: circular distal cap, load-and-pull the clip, then target.
A bleeding vessel in the duodenal bulb is hard to face with a bare gastroscope tip. Visualization, stability, and suction-trap of the vessel are weaker without a cap. A pyramidal cap can trap the clip on the way in. In this segment from my upper GI bleeding lecture, I show how a circular-end cap lets you visualize, stabilize, suction-trap the vessel, park the open clip, and deploy on target. The clip comes from the full-course lecture on novel tools and concepts for upper GI bleeding.
Why a Bare Scope Tip Loses the Vessel
Without a cap, the tip slides off the bulb wall. You cannot hold a stable en face view, you cannot suction a small mound of tissue around the vessel, and the hemostatic device has nothing to trap against.
That is why the sequence parks an already-open clip inside the cap, then advances across the pylorus. You travel with a ready clip instead of taking open jaws through the pylorus.
A pyramidal cap can trap the clip inside the hood. Cone-type caps are useful for dissection. For clip and injection hemostasis, use a cap with a circular end so the clip can go out and back in.
Step 1: Put a cap on and use it as a working hood
Place the cap on the endoscope before you chase the vessel. The cap keeps the scope tip in the bulb, improves visualization of the target vessel, and stabilizes the scope. It also lets you suction some tissue so the vessel sits in a small mound that a clip or injector can trap.
Video moment @ 0:10
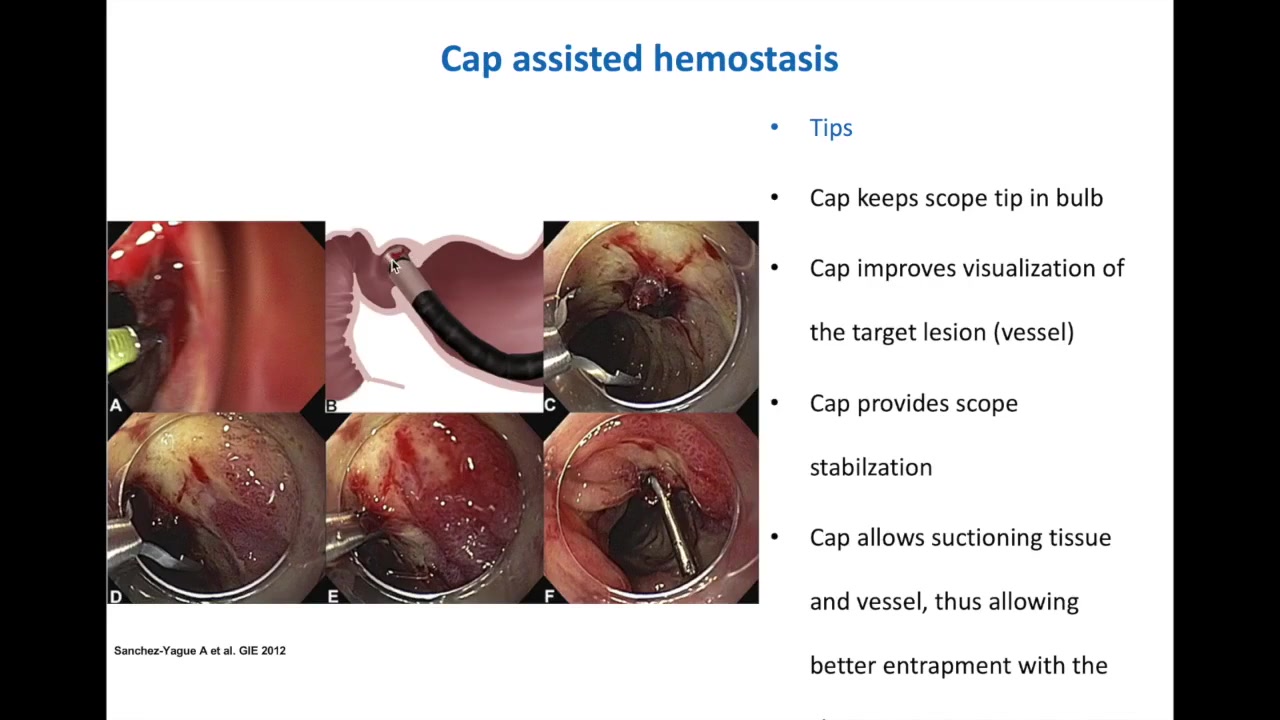
Significance: The cap is doing mechanical work before the clip ever opens. That is why freehand targeting feels sloppy in the bulb.
Step 2: Choose a circular-end cap, not a pyramid
Cone-type caps are useful for dissection. They are not the circular end you need for passing a clip in and out. A pyramidal cap can trap the clip inside the hood. The hemorrhage-suited caps sit in the center of the lineup on this slide. Use those for clips and injection.
Video moment @ 0:51
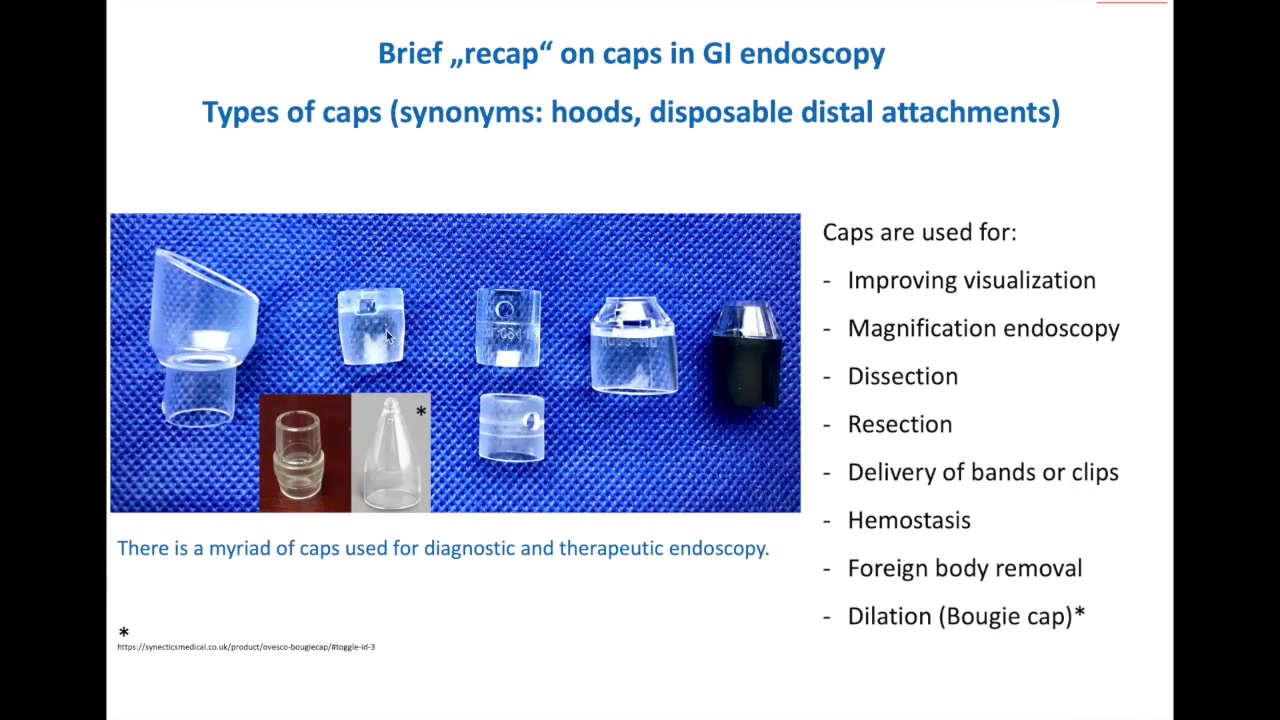
Significance: Shape is a device choice, not a preference. The wrong cap turns a working clip into a stuck clip.
Step 3: Advance the clip, open it, then pull it back into the cap
With the cap on, push the clip outside the cap and open the jaws. Then pull that open clip back inside the cap. The cap narrows the jaws so they look closed, but the clip is still open. That parked position is what you travel with. You can also pull the clip back into the cap later, once you are hunting the bleeding point, to keep the view clear.
Video moment @ 1:31
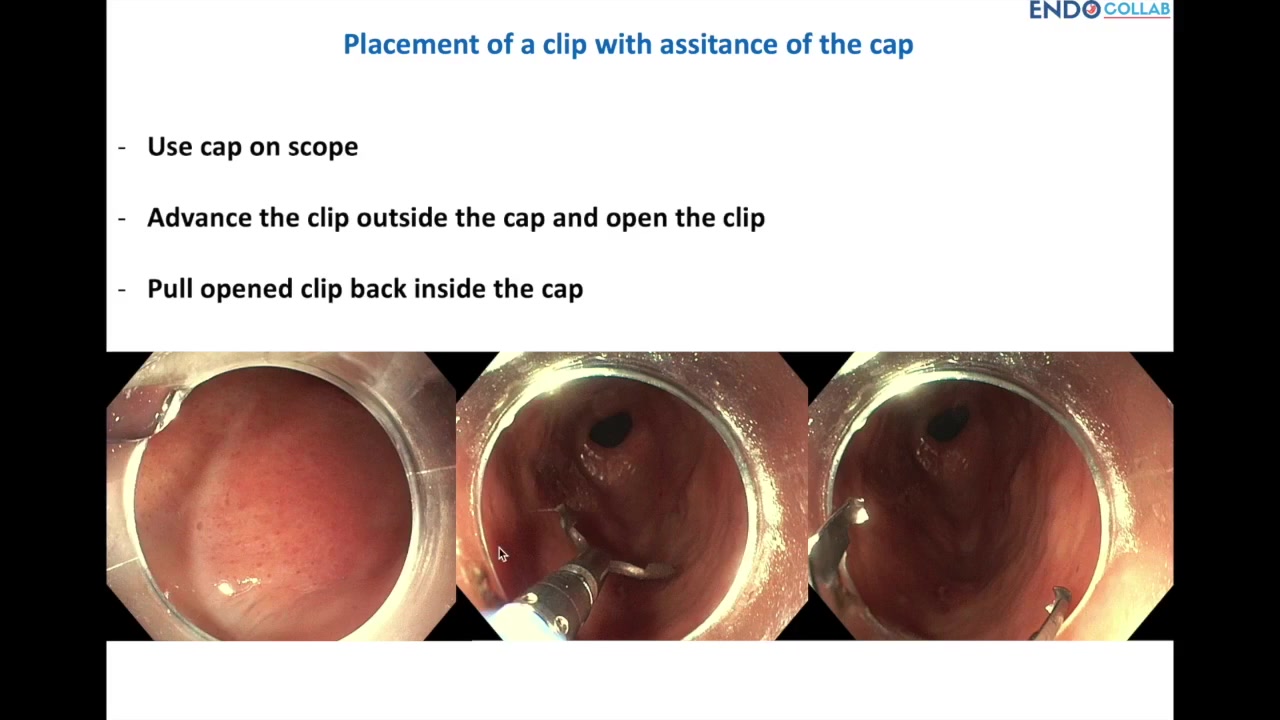
Significance: Parking the open clip in the cap is how you keep a ready clip without dragging open jaws through the pylorus.
The result you want in the note looks like this:
Cap-assisted clip: circular distal cap; clip opened then pulled back into the cap; vessel targeted en face.
Continue with a membership
Members get the pylorus-to-target sequence, the safety tent with coagulation grasper, the paste-ready note, and the full video.
Same format as our Prague classification guides: actionable steps you can use on the next case.
Already a member? Log in
Why should you avoid a pyramidal cap when clipping for hemostasis?
A pyramidal cap can trap the clip inside the cap. Use a circular-end cap when you need to pass a clip or injector out and back in. Cone-type caps are useful for dissection. They are a different shape question than the pyramidal trap.
How do you load a clip through a cap before crossing the pylorus?
Advance the clip outside the cap and open it, then pull the open clip back inside the cap so the cap holds the jaws narrow while the clip remains open. Cross the pylorus with that parked clip, target en face, then push the clip out to grasp. You can also pull the clip back into the cap while you search for the bleeding point.
Continue reading with a membership
Get access to the full content, course videos, case library, and our private WhatsApp community.
Already a member? Log in
We protect your privacy. No spam. Unsubscribe anytime.