A 7-minute guide to safe esophageal stricture dilation: read the wire, pass the stricture under control, and stop by rule, not by ambition.
You are looking at a tight esophageal stricture. The lumen is a pinhole and you cannot see what lies beyond it. The wire is in your assistant’s hand. Do you advance it blindly and hope it finds the stomach? In this segment from my strictures lecture, I show you how I read the Savary wire from outside the patient, how I pass tight strictures without creating a false tract, and the stopping rules that keep dilation safe.
Why Blind Wire Advancement Gets Endoscopists Into Trouble
A wire advanced blindly through a tight stricture can enter a false tract. The tract feels like progress, the dilator follows, and the result is a perforation. This complication is avoidable, but only if you treat wire passage as its own procedural step with its own technique.
The second trap is depth. Once the scope is out and the wire stands alone, most endoscopists have no idea how much wire sits inside the patient. Too much wire coils in the stomach. For these dilations, 60 to 80 centimeters at the mouth is the working depth.
The third trap is ambition. Dilating toward the diameter you want, instead of the diameter the stricture tolerates today, is how lacerations become perforations. The stricture does not have to be solved in one session.
Step 1: Read the Wire Markers Before You Dilate
The Savary-Gilliard wire has a floppy spring tip that helps prevent perforation, but the shaft is stiff, so it still demands respect. The shaft carries markers every 20 centimeters, starting at 40 centimeters. Three markers at the mouth means the tip is at 60 centimeters. Four markers means 80. Five means 100. This is not written in the books. When the wire is outside the mouth, the markers tell you exactly how deep the tip sits. For esophageal dilation, keeping the tip around 60 to 80 centimeters is ideal. And remember one hard rule: the spring tip cannot be withdrawn back through the dilator, so the dilator and the wire come out of the patient together.
Video moment @ 0:13
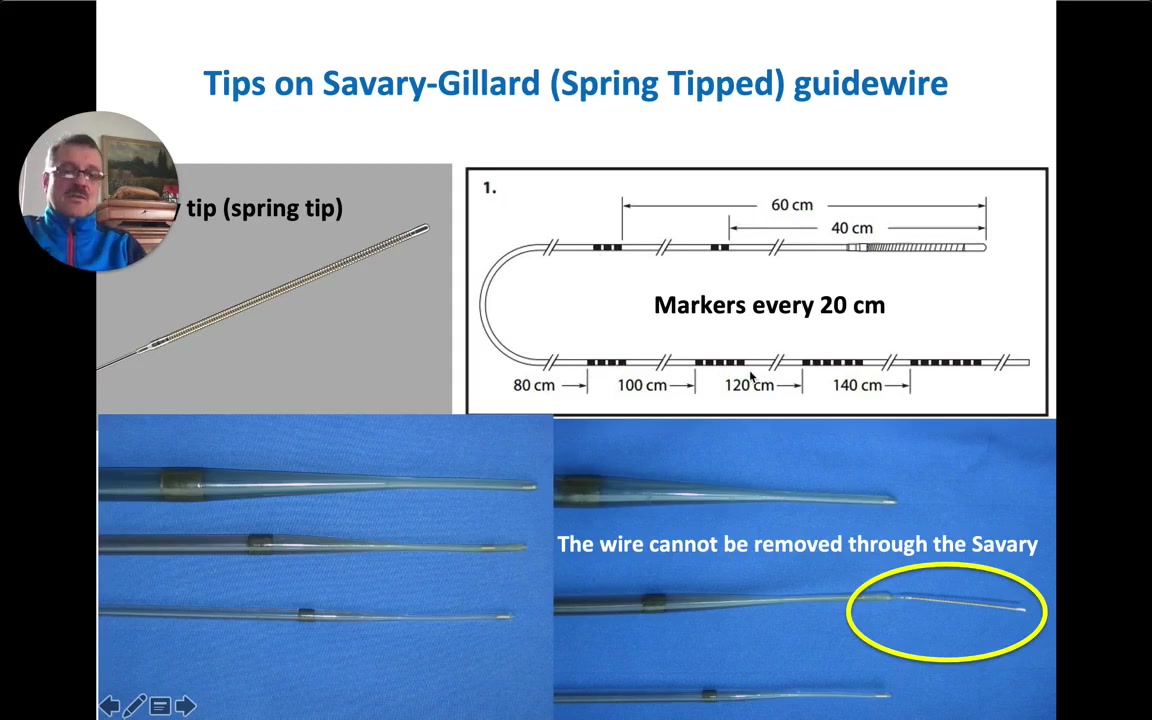
Significance: Knowing wire depth from outside the mouth prevents coiling in the stomach and keeps the tip in a safe working position during every dilator exchange.
Step 2: Pass the Stricture Under Control, Never Blind
There are two ways to place the wire. The first is to pass the endoscope into the stomach and advance the wire under direct control; if the stricture is tight, switch to a very thin endoscope so you can do this safely. The second is blind passage through the stricture. If you must go blind, I recommend two protections: fluoroscopy, and the flipped wire technique. Turn the wire tip into a J, a U shape, and then advance it through the stricture. A straight tip advanced blindly can find a false tract, and you may still end up with a perforation even with a flipped wire. The flip is a take-home protection, not a guarantee, which is why fluoroscopy stays part of the step. The same logic applies to the dilator: never advance a balloon or a Savary blindly into a stricture you have not interrogated.
Video moment @ 2:01
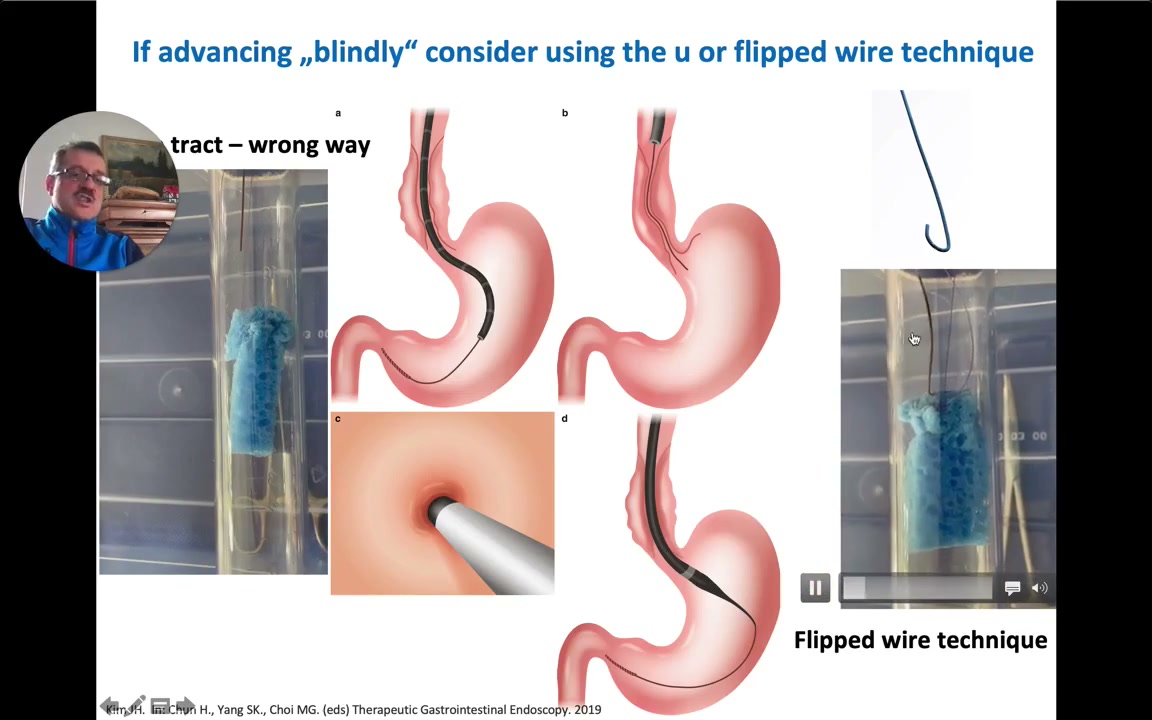
Significance: A wire that finds a false tract is how a blind pass becomes a perforation. The flip plus fluoroscopy is the protection; neither replaces the other.
Step 3: Size the Dilation to the Stricture, Not to Your Final Aim
Before any dilator touches the stricture, inspect it and risk stratify it. In the case shown in the clip, the stricture was tight and high risk, so we chose a 0.035 inch biliary wire and a small balloon. We started with an 8 millimeter balloon because the stenosis appeared elastic; had it looked more rigid, we would have gone down to 6 millimeters. The advantage of a through-the-scope CRE balloon held close to the scope is direct visualization: you watch the stricture open during dilation and inspect the result immediately after deflation.
Video moment @ 3:56
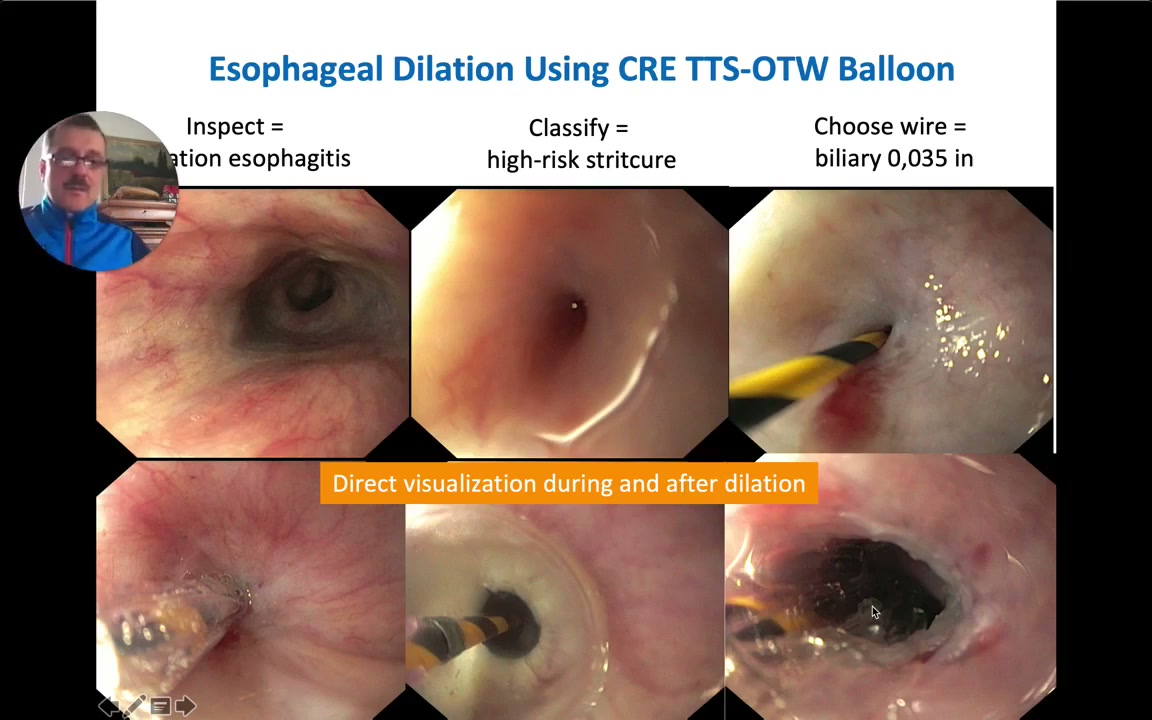
Significance: Balloon size is a clinical decision made at the stricture, based on how the tissue behaves, not a number decided before the procedure started.
Continue with a membership
Members get the remaining steps: the room setup Klaus uses on every dilation, the stopping rules including the rule of three, a paste-ready dilation note template, and the full video.
Same format as our Prague classification guides: actionable steps you can use on the next case.
Already a member? Log in
Continue reading with a membership
Get access to the full content, course videos, case library, and our private WhatsApp community.
Already a member? Log in
We protect your privacy. No spam. Unsubscribe anytime.