
by Joel Joseph, MD and Klaus Klaus Mönkemüller, MD, PhD, FASGE, FJGES
Department of Gastroenterology, Carilion Memorial Hospital, Virginia Tech Carilion School of Medicine, Roanoke, USA
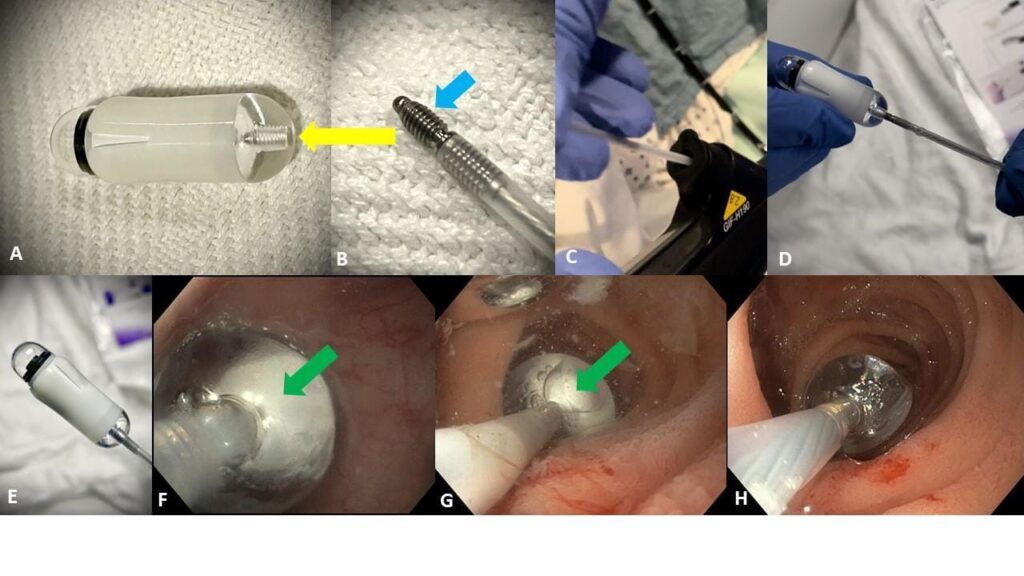
An elderly lady with obscure occult gastrointestinal bleeding could not swallow the capsule endoscope (CE) (PillCam) (Figure 1A). Therefore, an EGD was scheduled to introduce the capsule endoscope into the duodenum.

Figure 1
We utilized the AdvanCE capsule endoscope delivery device (Figure 1) (also see figure 3 at the end of article, which are the visual/photographic instructions from the device’s package).
The key steps to deploy a CE using this device are:
Know your equipment. The capsule deployment device consists of two parts, the capsule holder, which contains the capsule endoscope and has a screw-receiver at its base (Figure 1A, yellow arrow), and the b) delivery catheter, which has a screw on its tip (Figure 1B, light blue arrow).
It is important to first advance the screw catheter through the working channel of the scope (Figure 1C).
Once the screw catheter has exited the scope, the capsule holder (with the activated capsule) should be screwed (attached) to the screw catheter (Figure 1D). Careful attention must be paid not to lose the capsule while gently screwing the catheter to the base of the CE holder.
The attached capsule holder and CE shall be pulled towards the scope tip (1E).
Introduction of the scope and CE into the mouth holder is done under direct endoscopic view. We leave a distance of about 1 to 1.5 cm between scope tip and CE, in order to facilitate visualization of the oropharynx, larynx and upper esophageal sphincter (UES).
Once the vocal cords are seen endoscopically, the CE will be right at the entrance of the UES. While gently turning the scope to the right (clockwise) also push the scope forward. This combined maneuver will allow for the capsule endoscope to enter the esophagus (Figure 1F).
The scope and CE are then advanced towards the pylorus and into the duodenum (Figure 1G). The white color (green arrow) indicates that the CE is still attached.
We prefer to enter the second duodenum and deliver the capsule endoscope there. Why? Because delivery of the CE in the stomach may result in delayed entry into the duodenum. And leaving in the duodenal bulb of a patient with a “floppy” pylorus may result in capsule endoscope bouncing back into the stomach. However, if a patient has duodenal diverticulum or a tight or short genu between bulb and duodenum, we do not force placement into the second duodenum.
We like to apply a little water before deployment. This will stimulate the duodenal motility, remove any debris from the capsule endoscope, and slightly push the capsule away once it is freed from the device.
Liberating or deploying the capsule endoscope is quite easy. Just ask the assistant to open the “snare” handle (Figure 2, below). This maneuver pushes the capsule away. A sign that the capsule is released is the “transparency” of the delivery device (Figure 1H). Compare to the white color present when the capsule is still attached (Figures 1F and 1G, green arrow).

Figure 2

Figure 3
WATCH OUR-LASTEST VIDEO
Using the Mega Cap (RemOVE) to Remove Meat Impaction and Foreign Bodies

Here’s what you’ll learn by watching the video:
Explore the Mega Cap’s Innovative Design: Discover its standout features, including a size three times larger than traditional caps, a 60mm length with a 22mm catch capacity, and a 5ml inner volume—perfect for trapping larger foreign bodies with ease.
Master the Removal Technique: Learn the gentle torque maneuvers and suctioning methods that ensure successful extraction of food bolus and foreign bodies, even when only part of the object fits inside the cap.
Unlock Its Practical Advantages: See how the Mega Cap’s elasticity allows for smooth navigation through the upper esophageal sphincter and enhanced maneuverability, reducing the risk of complications.
Witness Real-World Impact: Watch demonstrations of the Mega Cap effortlessly removing a large meat impaction and a piece of hot dog stuck for over 24 hours—all in as little as five minutes.
Prioritize Patient Safety: Understand how to protect the esophageal lining by safely containing sharp or pointed objects (like pens and needles) within the cap during removal.
This video is packed with actionable insights that can elevate your skills and streamline your approach to these tricky procedures. Don’t miss your chance to see the Mega Cap in action and learn why it’s becoming the go-to rescue tool for foreign body removal.